Loading...
Loading...
Loading...
Loading...
Loading...
Loading...
Loading...
Loading...
Loading...
Loading...
Loading...
Loading...
Loading...
Loading...
Loading...
Loading...
Loading...
Loading...
Loading...
Copyright © 2017-2018 Jim Lyst and Michael Frontz, Indiana University School of Informatics and Computing at IUPUI
This material is part of the Computing by Design high school computer science curriculum developed for the Informatics Diversity-Enhanced Workforce (iDEW) program, an award-winning community partnership in central Indiana that is broadening student participation in computing and helping students develop the skills essential for success in the 21st century workplace. The iDEW program is managed by the Indiana University School of Informatics and Computing at IUPUI.
This work is licensed under a Creative Commons Attribution-NonCommercial-ShareAlike 4.0 International License. You are free to use, share, or adapt this material for noncommercial purposes as long as you provide proper attribution and distribute any copies or adaptations under this same license.
Investigate the basic use and logic of a chatbot script and make modifications to demonstrate initial understanding.
Before we get into the details of designing chatbot conversations, we want to practice how you will technically build them with code. Understand that machines and their programs are still rather "dumb" compared to humans and cannot interpret complex human ideas easily. So your challenge will be to connect a person's complex intentions to a rather simplistic computer program.
Let's get started with some chatbot code.
Go to the and copy the template code for each file and ensure that it works.
Take a look at the bot.rive file while you message with the chatbot. Notice how the script file controls how the bot responds to you.
Change the start response, which introduces your chatbot to the user. Include a name for your chatbot. You can change it again later.
Change the * response as well, where the bot responds to unknown user requests.
Add the following Rivescript lines below to respond to "hello" and "bye". Change the response as you like.
Demonstrate a working Chatbot.
+ hello
- Hi there. Thanks for visiting.

+ bye
- Good bye.Let's take our first dive into conversational interactions with a warm-up project that you will do individually. We will do some reading and research, as well as create an interaction script for a chatbot. This will provide a foundation for tackling your team project.
Let's add a simple pop sound effect when a message is sent by the chatbot.
First, download the mp3 file above of a pop sound. Alternatively, you could find or create your own sound if you like. Place the file in the same folder as your code files.
Add the following line to the very top of your Javascript to define a global variable for your sound. This will allow your code and the iDEW trivia library to use your sound.
var pop;Add the following line of code inside your setup() function. This will load your sound file so that it can be played later.
pop = new Audio('pop.mp3');That is actually all you need to do. It should work for you now. The iDEW chatbot library actually plays the pop sound (that you have made available) when the chatbot responds to a message.
Evaluate your chatbot with three participants.
Review the questions in the evaluation template and adjust the language if needed.
Record feedback from at least 3 classmates.
Reflect on the the responses and consider how you could incorporate changes to your bot.
Submit your feedback document.
Implement changes to your chatbot based on the previous evaluation and reflect on the key principles of chatbot design.
1. Incorporate Improvements in your Chatbot Based on your feedback in the previous activity, update your chatbot script and test it to ensure it works as expected.
2. Reflect on Key Learning Now that you have completed your first basic chatbot, reflect on the key aspects of building a successful chatbot. Create a document and write what you have learned in the following three areas of chatbot design, as if you were advising people on how to develop their own chatbot.
Chatbot Purpose: What are important ideas to keep in mind when developing the chatbot's purpose and the problem to be solved?
Chatbot Personality: What are key things to consider when determining a chatbot personality and why are they important? Provide some example dialogue between the user and chatbot to help explain your ideas.
Chatbot Scripting and Code: What did you find challenging, but very important, when creating the actual script/code for the chatbot? How do you think these challenges will affect a larger chatbot project that will have more complexity and features?
Submit your document (about one page in length). Make your document easy to follow and ensure the three items above are clearly covered.
Using functions in your chatbot script will provide some powerful options. For example, you can make calculations on the fly for the user, or you can access, search, and filter a database based on user input.
Below is an example function, demonstrating the syntax to use in your chatbot script file. We recommend that you put functions at the top of your file.
The function is called getRandomNumber and we include the word javascript to indicate that the function is written in javascript. The object tag syntax encloses the function. Notice that something is returned to be used by the chatbot. In this case, it is a random number.
In order to use the function in your chat script, you use the <call> tag like below.
If the user says "Random number please" (the trigger), the getRandomNumber function is called and the returned random number will be the response.
User: Random number please.
Bot: Here is your random number: 0.874612
A function can also accept arguments or inputs. See the example below.
The argument passed to the function is accessed by args[0]. If there were a second argument (like two numbers to be added) you would access it with args[1]. args is an array.
In order to use a function that accepts arguments, you place those values after the function name, like below.
Notice that we are using the user's input as our argument--a number in this case--using the <star> tag.
User: square 4
Bot: 4 squared is 16
Create a trigger in your chatbot script like the one below that will respond to the user typing "search" followed by a word. The response will begin with "Searching..." to provide feedback to the user, then call a searchTerms() function that we will define next.
The function below will process the search and return HTML about the results.
Let's step through what is happening above...
Line 2 uses the chatbot.dbFilter2() function. Notice there are 3 arguments used by the function.
- chatbot.db is the database to be searched.
- "term" is the column name to be searched. In this case we will search each term name.
- args represents the text the user has typed in for the search.
The variable filtered now contains the matches of our search.
Lines 3-5 takes each matched item and creates HTML for the term and definition that will be displayed to the user.
Line 6 defines a variable for our reply string. We start with "Didn't find any matches" as a default.
Line 7 modifies our reply with the HTML of terms and definitions if there were any matches.
Line 8 uses the chatbot.postReply() function to display the reply after 2 seconds.
Line 9 simply returns an empty string so that you don't get an undefined showing up in your chatbot in certain cases. The reply text is taken care of in the lines above.
Read about design aspects of conversational interactions with bots and synthesize your understanding in writing and discussion.
Read
What advantages/disadvantages do bots have over mobile apps?
What do you think the best uses of bots are or will be?
Read
How does the process of designing an app compare to the process of designing a bot?
Read
Why is a bot personality important?
What factors influence the design of a bot personality?
Document your answers to the questions above for each reading and be prepared to discuss in class.
> object getRandomNumber javascript
  return Math.random();
< object+ [*]random[*]
- Here is your random number: <call>getRandomNumber</call>> object getSquared javascript
var input = Number(args[0]);
return input*input;
< object+ square *
- <star> squared is <call>getSquared <star></call>+ search *
- Searching... <call>searchTerms <star></call>> object searchTerms javascript
var filtered = chatbot.dbFilter2(chatbot.db, "term", args); //used to be args[0]
var terms = filtered.map(function(row) {
return `${row.term}: ${row.definition}<hr>`;
});
var reply = "Didn't find any matches.";
if (terms.length) reply = "Here is what I found.<br>" + terms.join(" ");
chatbot.postReply(reply, 2000);
return '';
< objectDevelop a chatbot script that demonstrates several useful features and patterns in programming a conversation.
Any direct links to headings within the Rivescript documentation no longer work. Therefore, you will want to do a search for a keyword in the browser to find the content. We will update this page if we find a better way to link directly to the desired location in the Rivescript documentation.
Let's get familiar with the syntax of RiveScript and how it will provide the logic of your chatbot. For each item below carefully look at the documentation for RiveScript to understand the options available to you as you determine what is possible with your chatbot.
Read first section of The Code, Explained in the Rivescript documentation. Pay close attention to the "Important Note" in the reading that describes the importance of using lowercase with triggers.
Create four random replies to "hello" for your chatbot.
Define a single trigger (a trigger is the user input that starts with a "+" in the script) that will respond to these two user questions - "What do you do?" or "What can you do?" with a bot answer that you choose. For example, you could respond to the user with "I do very little at the moment." Hint: use the "alternatives and optionals" in RiveScript.
Use a redirection to your "hello" trigger when the user inputs "Hey". Basically, make your bot respond the same way to hello or hey.
Create a reply to "My name is Sue" (or any name). In your chatbot response, use the person's name---like, "Nice to meet you Sue, my name is ChattyBot." Hint: Use an open-ended trigger with a wildcard.
Have your bot kick-off the conversation with a question when it starts so the visitor knows how to continue the conversation. Also, add the needed script to listen for a response to that question and respond. Take a look at this example on short discussions.
Finally, choose two other features of RiveScript syntax to implement in your bot.
Have your chatbot working with the features described above and be prepared to demonstrate and explain how it works.
The code below will get you started with the iDEW chatbot template. It is a minimum starting point for a working chatbot that you will later modify and refine towards your design goals. There is a which doesn't do anything exciting -- that's up to you to change.
Below is the core html for the chatbot. The div element with an id="dialogue" is the block that contains the back-and-forth messages like you see in common messaging interfaces. The form element handles the user's text input at the bottom of the interface.
The required libraries are also loaded. PapaParse.js enables you to use a back-end database using Google Sheets. JQuery is a common library for Javascript programmers. Rivescript is the chatbot scripting language you will use (more on this later). Chatbot.js is the iDEW library that makes your programming easier.
Below is the minimal Javascript needed to get started. The setup ()function starts automatically once the page loads in the browser and simply loads the Rivescript file as your chatbot script to get things started.
The script below determines how your chatbot will converse with a visitor. The + start is automatically started to get the conversation going. The + * is a wildcard that catches anything that you have not programmed your chatbot to recognize. At first your chatbot recognizes little, but we will work on that soon.
There is a lot going on here with the styling of the chatbot. Use the code below as your starting point, but you may choose to change some elements later. A simple way to customize the look would be to change the background, font-family, and color of the body element.
For your chatbot we recommend that you place the bulk of your Javascript work in a proper Javascript file and keep your Rivescript "objects" very simple.
Your Rivescript file could simply call a Javascript function like below.
Notice how this will run the getRandomTerm() function, like the one below, that can be in your code.js file.
The chain of returns: The Javascript function will return the "term" (in this case) to the Rivescript object, which will then return that value to your script file
Design and develop a basic chatbot that solves a particular problem.
Ok, let's design a bot that actually does something useful. Each of you will define a simple problem for your bot to solve for somebody, then map out how your bot will function.
Define the Problem. Define what you want your bot to achieve for people. Keep it simple, but specific. For example, provide some background information about the August 2017 solar eclipse and link them to information about specific times to view the eclipse from their location.
Mini-Personas for the users and bot. Describe the people you want to serve with your bot. Also, describe the personality of your bot. Will it be formal or informal? Fun or serious? Etc.
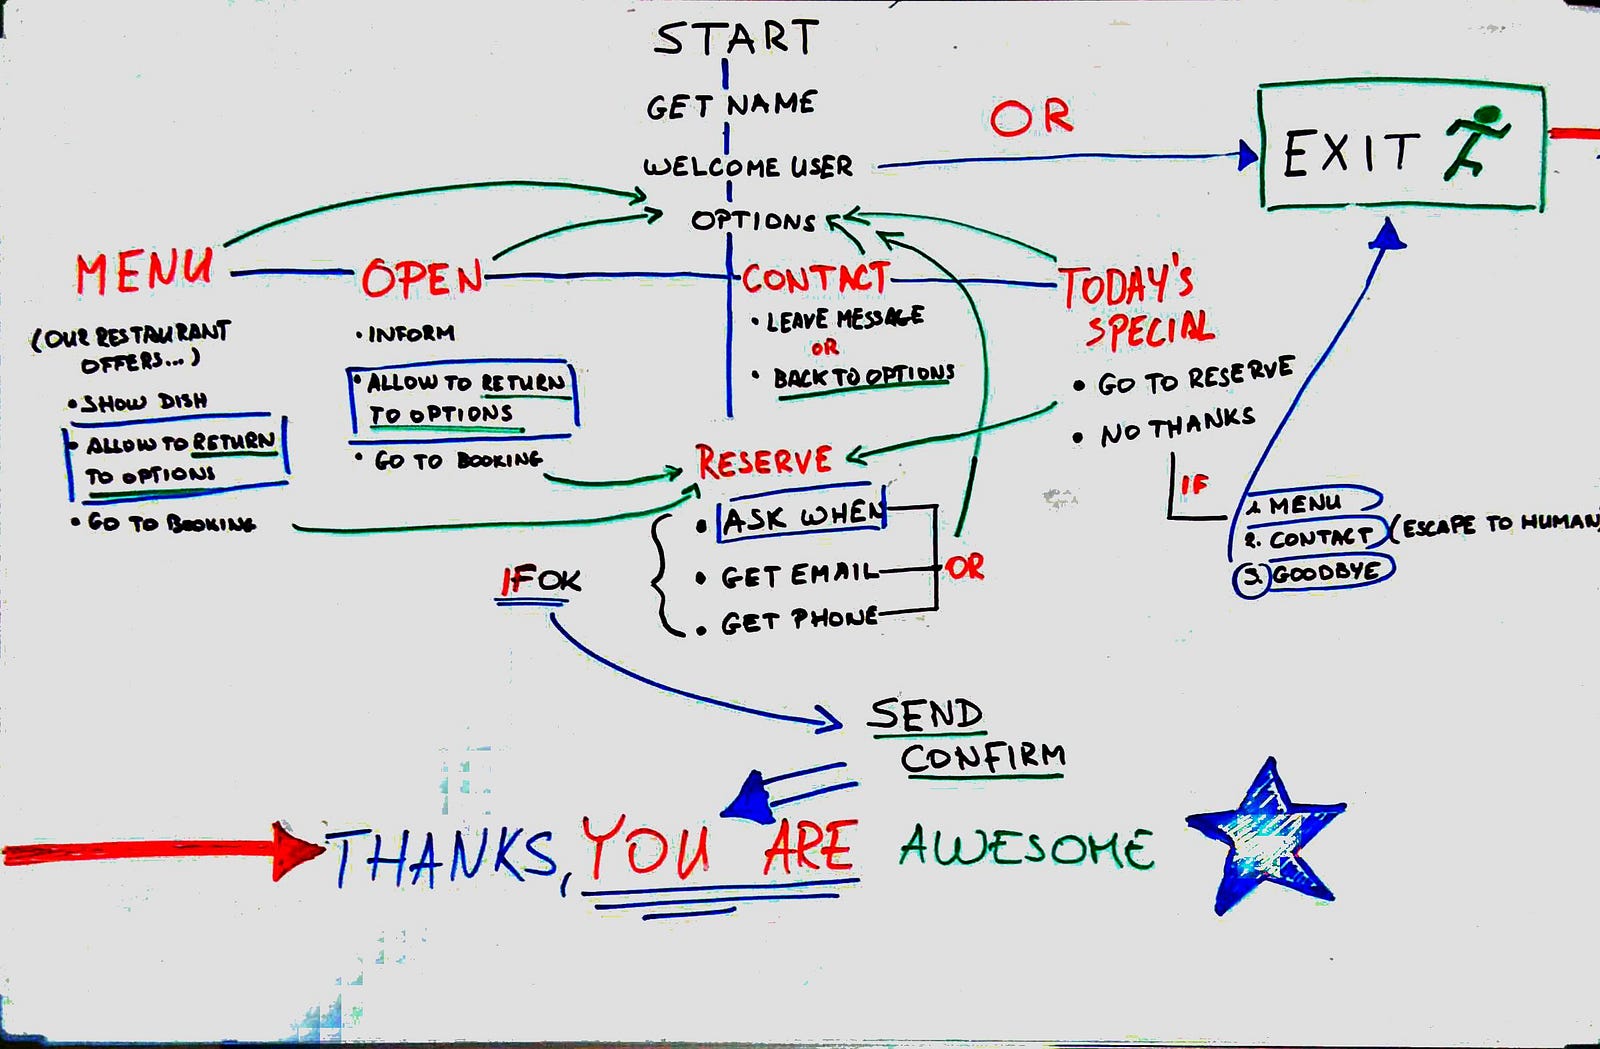
Create a Conversation Flow. Use (from ) as an example. . Remember, keep the ultimate goal of your bot very simple, but think about the potential paths a user may take to get there.
Edit Your Bot Script to Match. Finally edit your script (RiveScript) to match your bot flow and test it in the message app.
Use for your Design Document in steps 1 - 3.
Submit your design document in class
A Checklist for Chatbot Usability
Is the name compatible with the purpose of the bot?
Does the initial chatbot message provide an indication of what the user should do next?
Does the bot recover well if the user get's lost in the conversation or provides unusable information?
Are the triggers (what the user can say) flexible enough to handle the different ways users may say something.
Is it generally helpful? Does it provide a sense of closure to the user even if the user thought your bot would provide something different?
While a text interface is great for allowing people to engage with natural language, there are times when a simple button has advantages allowing you to interact with specificity and save time for the user.
Below is an example of how you could insert buttons in the chatbot's response. It uses a standard HTML button element with an onclick attribute to run the `getReply() function of the chatbot library. Notice how each argument in the getReply functions ('hello', 'bye', or 'youre awesome') is a string that will match a trigger in your Rivescript file.
That's it. Modify as needed.
> object getRandomTerm javascript
  return getRandomTerm();
< object

+ random
- Finding a random term... <call>getRandomTerm</call>function getRandomTerm() {
var randomIndex = Math.floor(Math.random() * chatbot.db.length);
currentItem = chatbot.db[randomIndex]
return currentItem.term;
}<!DOCTYPE html>
<html>
<head>
<title>iDEW Chatbot</title>
<meta http-equiv="Content-Type" content="text/html; charset=UTF-8">
<meta name="viewport" content="width=device-width, initial-scale=1">
<link rel="stylesheet" type="text/css" href="style.css">
</head>
<body>
<div class='wrapper'>
<div id="dialogue"></div>
<form onSubmit="return chatbot.sendMessage()">
<div class="text-box">
<input type="text" name="message" id="message" autocomplete="off" disabled placeholder="Please wait... loading...">
<input class="send-button" type="submit" value=">">
</div>
</form>
</div>
<script type="text/javascript" src="https://cdnjs.cloudflare.com/ajax/libs/PapaParse/5.1.0/papaparse.min.js"></script>
<script src='https://cdnjs.cloudflare.com/ajax/libs/jquery/3.3.1/jquery.min.js'></script>
<script src="https://unpkg.com/rivescript@latest/dist/rivescript.min.js"></script>
<script src="https://cdn.jsdelivr.net/gh/idewcomputing/code-chatbot/src/chatbot.js"></script>
<script src="script.js"></script>
</body>
</html>function setup() {
chatbot.loadFiles(['bot.rive']);
}
window.onload = setup;// conversation script is below
// "start" auto-runs to begin the bot conversation
+ start
- Hello. I am a brand new bot with little to say.
+ *
- Sorry, I don't understand that.body {
background: linear-gradient(#A90329, #6d0019);
font-family: Verdana,Arial,Helvetica,sans-serif;
font-size: small;
color: #000000;
padding: 0;
margin: 0;
line-height: 1.7em;
}
button {
background-color: rgba(255,255,255,.5);
padding: 5px;
outline: none;
border: 1px solid rgba(0,0,0,.3);
border-radius: 5px;
}
.wrapper {
max-width: 450px;
height: 100vh;
box-sizing: border-box;
margin: auto;
padding: 0;
background-color: rgba(255,255,255,.1);
display: flex;
flex-direction: column;
border-left: 1px solid rgba(255,255,255,.2);
border-right: 1px solid rgba(255,255,255,.2);
}
form {
flex: 5;
display: block;
padding: 15px;
}
.text-box {
font-size: 16px;
display: flex;
width: 100%;
}
input#message {
padding-left: 11px;
padding-right: 9px;
font-size: 16px;
height: 27px;
display: block;
flex: 10;
outline: none;
margin: 0 10px 0 0;
box-sizing: border-box;
border: 1px solid #aaa;
border-radius: 13px;
}
input.send-button {
display: block;
background-color: rgba(255,255,255,.6);
flex: 1;
border: 1px solid rgba(0,0,0,.2);
height: 27px;
box-sizing: border-box;
font-size: 16px;
line-height: 25px;
padding: 0;
border-radius: 13px;
}
div#dialogue {
overflow-x: none;
overflow-y: auto;
display: block;
flex: 95;
box-sizing: border-box;
width: 100%;
padding: 15px;
}
.bot-row, .user-row {
padding: 1px 0 10px 0;
display: block;
postion: relative;
}
.user-row {
text-align: right;
}
.user, .bot {
font-size: 16px;
padding: 5px 8px;
margin: 1px;
border-radius: 12px;
display: inline-block;
postion: relative;
}
.bot {
margin-right: 50px;
background-color: rgba(255,255,255,.85);
border-bottom-left-radius: 0;
}
.user {
margin-left: 50px;
color: white;
background-color: #3b3;
border-bottom-right-radius: 0;
}+ start
- What would you like to say?<br>
^ <button onclick="chatbot.getReply('hello')">Hello</button><br>
^ <button onclick="chatbot.getReply('bye')">Bye</button><br>
^ <button onclick="chatbot.getReply('youre awesome')">You are Awesome</button>
+ hello
- Hi.
+ bye
- Bye. Come back soon.
+ youre awesome
- Thanks. You are even more awesome.The example code below demonstrates how you could add flip cards to your chatbot. Here we use a flip card to create a study tool for terms and definitions. This example is an adaptation of a blog post by David Walsh.
Below, the getRandomFlipcard function gets a random term from the database and creates a flash card with the term on the front side and the definition on the back. Buttons for the user to get another term or quit are provided. You can use this code below, but you may need to make adjustments to work with your database column names.
> object getRandomFlipcard javascript
  var randomIndex = Math.floor(Math.random() * chatbot.db.length);
  var currentItem = chatbot.db[randomIndex]
  var html =  `
    <div class="flip-container" ontouchstart="this.classList.toggle('hover');">
      <div class="flipper">
        <div class="front">
          ${currentItem.term}
        </div>
        <div class="back">
          ${currentItem.definition}
        </div>
      </div>
    </div>
    <button onclick="chatbot.getReply('flipcard');">Next</button>
    <button onclick="chatbot.getReply('start');">Quit</button>`
  return html;
< objectBelow is a simple trigger you can use, but you will likely want to customize how the user starts using flip cards, whether by clicking a button or using a different keyword trigger.
+ flipcard
- <call>getRandomFlipcard</call>You will need the CSS below for the flip card to work. It is recommended that you paste this to the bottom of your stylesheet.
/* For flip card */
/* entire container, keeps perspective */
.flip-container {
	perspective: 1000px;
  margin: auto;
}
	/* flip the pane when hovered */
	.flip-container:active .flipper, .flip-container.hover .flipper {
		transform: rotateY(180deg);
	}

.flip-container, .front, .back {
	width: 325px;
	height: 50vh;
}

/* flip speed goes here */
.flipper {
	transition: 0.6s;
	transform-style: preserve-3d;
	position: relative;
}

/* hide back of pane during swap */
.front, .back {
	backface-visibility: hidden;
  box-sizing: border-box;
  padding: 10px;
  height: calc(50vh - 30px);
  background: white;
  box-shadow: 1px 1px 6px #888;
	position: absolute;
	top: 0;
	left: 0;
}

/* front pane, placed above back */
.front {
	z-index: 2;
	/* for firefox 31 */
	transform: rotateY(0deg);
}

/* back, initially hidden pane */
.back {
	transform: rotateY(180deg);
}
/* End flip card */
That's it. Your flip card should work, but you may have to make modifications to how you access your database.
Rivescript offers a way to store data in your chatbot. For example, you could use the following script.
For a more detailed explanation go .The only limitation is that it only stores the name for the duration of the browser session. In other words if the user leaves your chatbot and comes back another time, his or her name will not be remembered (or stored) by the chatbot. The next way uses Javascript localStorage to store the data for longer periods.
localStorage WayUsing this method we can store information that will remain in the browser, even after a browser refresh. (Unless the user clears the browser cache, which is not typical.) First let's create some Javascript functions in our Rivescipt file to store, get, or clear a user's name.
Learn more about localStorage in Javascript .
Next, create the script needed to use these functions, like below.
You can modify the examples above to store and retrieve different information.
There are a couple of ways you could add topics to your chatbot. But we recommend you do it the following way if you are working in teams.
Remember that you can always access the to understand them more.
1. Create separate chatbot script files for each topic. In addition to your main script file (bot.rive) create files like bot-topic-1.rive and bot-topic-2.rive for your topics.
2. Place topic tags in each of the new files with the script embedded like this.
3. Include an entry point to the new topics in your main chatbot script file using something like this, where the bot goes to the new topic if the visitor types "go to topic 1".
The {@ start} triggers the new topic's + start line. So in this case the chatbot would respond to "go to topic 1" with "Greetings from topic 1".
4. Lastly, have the javascript load your new files. Find the chatbot.loadFiles function in your code.js file and add your new files like below.
You will definitely want to customize and refine the scripts above, but you should be on your way.
+ my name is *
- <set name=<star>>It's nice to meet you, <get name>.

+ what is my name
- Your name is <get name>, silly!> object storeName javascript
localStorage.setItem("name", args[0]);
< object
> object getName javascript
var name = localStorage.getItem("name");
if (name) return name;
else return "what is your name?"
< object
> object clearName javascript
localStorage.removeItem("name");
return "Name removed.";
< object+ start // "start" autostarts the bot conversation
- Hello, <call>getName</call>
+ *
% hello what is your name
- <call>storeName <formal></call>Nice to meet you <call>getName</call>
+ clear
- <call>clearName</call> > topic 1
+ start
- Greetings from topic 1.
+ (hello|hi)[*]
- Hi, you are in topic 1.
+ bye
- {topic=random} OK. I'll send you back to the main script.{@ start}
< topic + go to topic 1
- {topic=1} {@ start}chatbot.loadFiles(['bot.rive', 'bot-topic-1.rive', 'bot-topic-2.rive']);You can use a Google Sheet as a database for your chatbot. Making a database this way allows you to more easily offer a lot of information for your users. For example, you could create a dictionary of terms on a topic that your chatbot would use to help people searching for information.
Below is an example of a spreadsheet of machine learning terms. Of course, you could have many more terms. The key is to make it a simple table with single word headings on the first row.
In order to import your information, you will need to publish your Google Sheet.
Publish your copy of the spreadsheet by ...
Selecting File > Share > Publish to the web...
Then under the link heading select the sheet you want to use with the first drop-down menu
Select comma-separated values (.csv) from the second drop-down menu.
Finally, click the Publish button and copy the link provided.
Once your spreadsheet is published, copy the shareable link. (Make sure your link is not restricted to your organization.)
Update the code.js file inside the setup() function to what you see in lines 4 - 7 below. Notice that chatbot.loadFiles(['bot.rive']); has been moved inside the chatbot.getDB function. This ensures that your database has loaded before the chatbot is started.
function setup() {
	pop = new Audio('pop.mp3');
  chatbot.replyDelay = 500;
  chatbot.getDB('https://docs.google.com/spreadsheets/d/e/2PACX-1vQVGvNvFcTxeu2zL1u8xSicbmD7Vghr_gjBp-lhAXscGi0nzy9RX7ZU0Hp0GvQgPP0cpgSeyBbUa8_Y/pub?gid=0&single=true&output=csv').then(data => {
    chatbot.db = data;
    chatbot.loadFiles(['bot.rive']);
  });
}
You will need to change the link above to the link you copied in the previous step for your Google sheet. Your spreadsheet data is now available in an array, chatbot.db, where each array element represents a row in your spreadsheet as an object.
For those that may have previously used loadDB( ):
The loadDB( ) function still works but it is being deprecated. You should use the getDB( ) shown above since it supports loading multiple databases.
The chatbot.db array now contains your spreadsheet data as a list of Javascript objects like the one shown below. See the connection to the spreadsheet we started with? So, in Javascript you could use chatbot.db[0].keywords to get the first term's key words ("labeled, training").
[
  {
    id: "0",
    term: "Supervised Learning",
    definition:
      "Supervised learning is the machine learning task of inferring a function from labeled training data.",
    keywords: "labeled, training"
  },
  {
    id: "1",
    term: "Unsupervised Learning",
    definition:
      "Unsupervised learning is a type of machine learning algorithm used to draw inferences from datasets consisting of input data without labeled responses.",
    keywords: "no labels, inferences"
  },
  {
    id: "2",
    term: "Reinforcement Learning",
    definition:
      "Reinforcement learning (RL) is an area of machine learning inspired by behaviorist psychology, concerned with how software agents ought to take actions in an environment so as to maximize some notion of cumulative reward. ",
    keywords: "reward"
  },
  {
    id: "3",
    term: "Perceptron",
    definition:
      "In machine learning, the perceptron is an algorithm for supervised learning of binary classifiers.",
    keywords: "classifier, binary, classify"
  }
]You could now access your database in a function like the one below. This function gets a random term to quiz the chatbot user. Notice how the chatbot responds to "quiz me" by calling the getRandomTerm function (object) which returns a random term so the chatbot responds with something like "What is Reinforcement Learning?".
  > object getRandomTerm javascript
    var randomIndex = Math.floor(Math.random() * chatbot.db.length);
    var currentItem = chatbot.db[randomIndex]
    return currentItem.term;
  < object

  + quiz me
  - What is <call>getRandomTerm</call>?
Wow. That's seems like a lot of work for such a short dialogue. But now you could have one of 10,000 terms randomly displayed to the user. There will be more examples of functions accessing a database in the listed Code Mods.
If you want to access multiple Google Sheet files to create multiple databases, you can reuse the getDB( ) function to load several databases like below. This allows you to access each database with chatbot.db, chatbot.db2, and chatbot.db3.
// replace the 'link' text in each to match your spreadsheet links
// for each Google Sheets file
chatbot.getDB('link').then(data => chatbot.db = data);
chatbot.getDB('link2').then(data => chatbot.db2 = data);
chatbot.getDB('link3').then(data => chatbot.db3 = data);If you want to use a single Google Sheets File that has multiple named sheets, you can use the getDB( ) function in the following way. Notice that you must include the sheet name along with the link in this case.
// replace the 'link' text and 'sheet name' in each to match your spreadsheet link
// and corresponding sheet names
chatbot.getDB('link', 'My First Sheet Name').then(data => chatbot.db = data);
chatbot.getDB('link2', 'My Second Sheet Name').then(data => chatbot.db2 = data);
chatbot.getDB('link3', 'My Third Sheet Name').then(data => chatbot.db3 = data);


